Light can define space, substance and style. Outdoors, with the shifting sun and atmospheric conditions, light and the shadows change the appearance of things natural and man made. But in the indoors, the play of natural and artificial lighting largely determine both function and decoration.
Today lighting is considered to be a very important element of decorating scheme. The invention of the incandescent bulb in 1978 revolutionized lighting systems as it allowed light to be easily manipulated. Apart from exploiting natural light by using opaque or transparent glass walls, sky lights, large windows etc. for offices, architect work out the detailed light fittings which are conducive for a work environment. In homes, a careful selection of lights extends and enhances the aesthetics of interiors. Similarly for hotels, showrooms, museums, gardens, water bodies, individual lighting requirements are worked out. Artificial light falling from various angles and heights on different surfaces guide us to perceive various features and dimensions while creating a specific mood. With technological developments and the stress on precision lighting, a variety of lighting fixtures are readily available with options which offer manifold possibilities in terms of effect.
The choice of fitting according to the room , gets very difficult , one gets puzzled off as there are so many varieties in lights like the table lamps , spot lights , clamp lights , recessed / surface mounted lights , up lighters , halogens , incandescent bulb , pendants , fluorescent fixtures and lots of others. Once the basic idea of the space, mood, interior design, highlighting, function of work have been specified, one can then consider the basic types of lighting. Initially only the planned positions of lights need to be decided. Later, the selection of bulbs and the exact effect can be created. One should always keep in mind some of the basic rules while designing the light.
*Every activity that takes place in the interior must have lights of the right kind, intensity and the right direction.
*The eye prefers even lighting with the minimum of contrast between the brightness of the room surfaces and the lighting fixtures.
*The eye works best when the work surface is more brightly lit then the surroundings.
*The eye is stimulated by the contrast of tone and sparkle.
*When room lighting change, color changes or disappear,thus objects become more or less important in the room.
*There are three basic types of lighting which are categorized according to the intensity of the light used.
Gene ral lighting
 ral lighting
It supplies an overall illumination in the area.
Task  lighting
 lighting
It supplies the required illumination for specific tasks such as reading, painting etc. It directs strong local illumination without high general illumination as required for activities carried in a particular area.
Accent  lighting
 lighting
It offers a decorative element to the area by highlighting the particular objects or features in the area. They are auxiliary to the general lighting and provide an added, and at times, dramatic dimensions to the scheme.
Spaces can be provided with one, two or all types of these lightings, depending upon the requirement. With different types of lighting in each room and dimmers to adjust the intensity of light, an ordinary space can be infused with much dramatic look to convey different moods to suit different times of the day.
LIVING ROOM lighting
*Establis h an adequate general illumination level to reduce the accent light, brightness, contrast.
 h an adequate general illumination level to reduce the accent light, brightness, contrast.
*Illuminate an entire wall with overhead fixtures to provide background for room furnishings.
*Feature window areas with the cosmic lighting.
*Indirect light like that under a pelmet or above a cabinet will supply soft uniform illumination.
*Use dimmers to program lighting moods.
*Play up with the architectural features like ala, niches, mantles etc.
*Highlight artwork and plants with individual lighting arrangements.
*Be sure that the floor, table and hanging fixtures have adequate shades to prevent glare.
*Plan adequate lighting to handle a variety of family activities like rack for display.
*Bar area could use incandescent light to play up sparkling glassware. Lighted shelves or fluorescent fixtures under the front edge of bar are effective.
Dining Room Lighting
The dec or of dining room depends upon the culture of the family. A dining room can change the style of eating. So one should be careful while playing with the lights to make the environment relax and easy.
 or of dining room depends upon the culture of the family. A dining room can change the style of eating. So one should be careful while playing with the lights to make the environment relax and easy.
*One must keep the visual emphasis off the ceiling and walls and on the decor of food and guests.
*Ceiling down lights should fall and focus primarily on dining room table surface.
*Candles and fuel lamps in decorative holders can add special touch to any meal.
Buffet or service areas and chinaware/silverware/crockery displays deserve special lighting emphasis.
Kitchen Lighting
Kitchen is a pla ce where a lady spends her maximum time so it should have comfortable and fresh feeling. Today's kitchens are far removed from the dark dingy spaces one saw earlier.
 ce where a lady spends her maximum time so it should have comfortable and fresh feeling. Today's kitchens are far removed from the dark dingy spaces one saw earlier.
*General lighting for a kitchen should be well distributed, uniform and as shadow less as possible.
*Fluorescent fixtures reduce the energy demands without sacrificing illumination.
*Even if there is window in the kitchen, install down lighting over a sink for cloudy days or nights.
*Special lighting for key work areas can be installed in the ceiling or in the upper cabinets.
*Provide light for storage areas in pantry or wall cabinets overhead or shelf mounted brackets will do the job.
Bathroom Lighting
Planning and designing is a tedious job. Today's bathroom wears a well dressed look, its design recognizing people's needs to begin and end their day in pleasant surroundings. It is after all an intimate personal place- perhaps the only room in the house where one can be totally private and get much needed peace.
 and designing is a tedious job. Today's bathroom wears a well dressed look, its design recognizing people's needs to begin and end their day in pleasant surroundings. It is after all an intimate personal place- perhaps the only room in the house where one can be totally private and get much needed peace.
*For a relatively small room, the bath area can use a no. of different types of lighting.
*General lighting is essential in a compact bath, a central ceiling may suffice.
*Medium size and large size baths and especially those with sectioned areas for tub, shower and toilet will require several overhead fixtures.
*The lights are general, recessed into the ceilings or those over a tub or a shower must be watertight and vapour proof. A minimum of 100W incandescent or 60W fluorescent lamp is sufficient.
*The most critical lighting in a bath centers on the mirror area, this is the basic for good grooming. For shaving, make up applications hair care, light should be soft and diffused without glare or shadow.
*Avoid lighting the mirror itself rather light of the person looking into the mirror. The most efficient to light up a person's face is to use three fixtures, one on either side of the mirror or one overhead. Side fixtures should be mounted 30" - 36" apart on the wall and install about 60" above the floor.
*Incandescent fixtures should have a minimum of 75W bulb and fluorescent tubes on either side of 20W and one tube of 30W or two tubes of 15W overhead. Additional bath lighting for specific purposes may include plant lights to take the advantage of bath humidity for growing the flowers and ferns.
Reading Room Lighting
The study  is the most important room for the intellectuals, for students as this is the room where one builds his career. In the reading room, one should plan the lights very carefully as the intensity affects a lot on the eyes thus on the health.
 is the most important room for the intellectuals, for students as this is the room where one builds his career. In the reading room, one should plan the lights very carefully as the intensity affects a lot on the eyes thus on the health.
*In a study, the priority is to provide adequate illumination for reading and writing. For maximum pleasure of reading and for easier concentration, reading lamps must have a proper quality and quantity of illumination and be placed so that the light falls comfortably on the open page.
*The complete room may be lit with powerful up lighters, down lighters, or the general lighting may be reduced to be supplemented with task lights as required. For the study it is necessary that task lights be supported with general illumination even if it is of low intensity to avoid eye strain.
*Care should be taken where computers are placed; the task light should not produce glare or reflections on the screen. Task lights for writing should be positioned so as to avoid both glare and shadow.
*If floor lamps are used as reading lights, then it should be 40"-49" from the floor to the bottom edge of the shade. The shade should be moderately illuminous to softly diffuse the light and eliminate glare, thus open top shades are preferred.
Swimming Pool Lighting
Water pre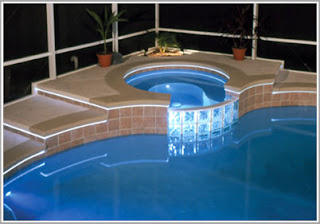 sents a challenging and rewarding medium for lighting. Swimming pools, fountains, waterfalls magically come to life with lighting effects at night.
 sents a challenging and rewarding medium for lighting. Swimming pools, fountains, waterfalls magically come to life with lighting effects at night.
*For effective swimming pool lighting, the lights are generally set below the water level, into the sides of the pool.
*This should be done while the construction of the pool so as to keep the wiring away from water.
*The lights should be placed to shimmer down the deep end of the pool.
*Fountains are effectively lit by submerged narrow beam sources set near the base of each jet or falling on the flowing water casting a color and sparkle on it. Waterfall comes to life when lit from behind.