 In order to work effectively with AutoCAD, you have to work with this system. Until you are comfortable and familiar with it, learning AutoCAD will be more of a chore. My experience in teaching is that the better a student is with co-ordinates, the better CAD draftsperson they will become..
Here is how it works:
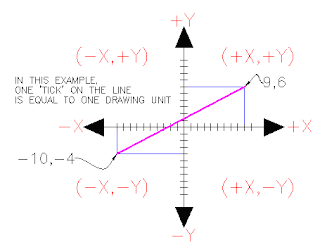
AutoCAD uses points to determine where an object is located. There is an origin where it begins counting from. This point is (0,0). Every object is located in relation to the origin. If you were to draw a line straight out to the right from the origin, this would be considered the positive X-axis. If you were to draw a line straight up, this would be the positive Y-axis. The picture above shows a point located at (9,6). This means that the point is 9 units over in the X-axis and 6 units up in the Y-axis. When you are working with points, X always comes first. The other point shown is (-10,-4). This means that the point is 10 units in the negative X-axis (left) and 4 units in the negative Y-axis (down).
A line has two points, a start point and an end point. AutoCAD works with the points to display the line on the screen. Move your cursor over the picture above and you will see line drawn from the absolute points of (-10,-4) to (9,6).
Most of the time you will not have an indication of where the origin is. You may need to draw a line from the endpoint of an existing line. To do this you use relative points. These work the same way, but you have to add the @ symbol (shift+2) to tell AutoCAD that this next point is relative from the last point entered.
To review: ABSOLUTE POINTS are exact points on the drawing drawing space. RELATIVE POINTS are relative to an OBJECT on the drawing space.
Its a simple system, but mastering it is the key to working with AutoCAD and is explained in more detail further below.
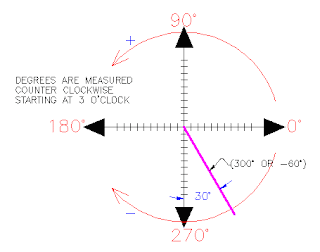
AutoCAD measures angles in a particular way also. Look at the diagram below and then place your mouse on it to see how this is done.
 When drawing lines at an angle, you have to begin measuring the angle from 0 degrees, which is at the 3 o'clock position. If you drew a line at 90 degrees, it would go straight up. The example above (when you move your mouse over it) shows a line drawn at +300 degrees (270+30), or -60 degrees.
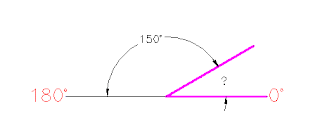
You might not always have an obvious reference point for 0 degrees. Look at the example below and place your mouse on the image to find out angle in question.
 In this example, you are given information about the lines, but not the angle AutoCAD needs to draw the line from the start point. What you are given though, is (a) the knowledge that 0° is at the 3 o'clock position (b) the knowledge that 180° is at the 9 o'clock position and (c) the angle between 180° and the line you want to draw is 150°. With this information, you can figure out what angle you need. Here is a fool-proof way of getting the angle you need:
1.) Start at the 0° position and measure counter-clockwise (+) to 180°.
2.) From 180°, measure clockwise 150°.
3.) Consider that you just went +180-150 and use that as an equation: +180-150=30
4.) Now you can draw your line using polar co-ordinates (discussed below)
You can enter points directly on the command line using three different systems. The one you use will depend on which is more applicable for the situation. The first assignment will get you used to this. The three systems are as follows:More Info
ABSOLUTE CO-ORDINATES - Using this method, you enter the points as they relate to the origin of the WCS. To enter a point just enter in the exact point as X,Y.
RELATIVE CO-ORDINATES - This allows you to enter points in relation to the first point you have entered. After you've entered one point, the next would be entered as @X,Y. This means that AutoCAD will draw a line from the first point to another point X units over and Y units up relative to the previous point.
POLAR CO-ORDINATES - You would use this system if you know that you want to draw a line a certain distance at a particular angle. You would enter this as @D
------------------------------------------------------------------------------------
There are many ways to do things in most Windows programs. AutoCAD is no exception. Everyone will develop a way that works best for him or her. In this course, we will primarily be working with the keystroke commands. The reason for this is because they will work in most AutoCAD versions (including DOS versions), and in some other CAD programs. The icons work well, but as you will see, icons can be placed anywhere on the screen and can be difficult to find quickly. You may be working on another employee's computer that is set up differently than than what you're used to. The pull-down menus will access almost all commands, but are a slower way of doing things.
Example: If you want to draw a line, you can do it a few ways:
* At the command line type: LINE (or) L and press the ENTER key.
* Select the line icon
 Line Icon from the DRAW toolbar.
* Select Draw > Line from the pull-down menu
All three approaches will do the same thing: prepare AutoCAD to draw a line where you tell it.
AutoCAD is a popular program because it can be customized to suit an individual's needs. The toolbars are a good example of this. You can have the toolbars you use most often on the screen all the time. You can easily make them go away so that you have more drawing space. You can also customize them so you have the most common commands on one toolbar. For example, the dimensioning toolbar is one that you will not want taking up space on your screen while drawing, but is very handy when you're dimensioning your drawing.
*Title Bar
This will show you what program you are running and what the current filename is.
*Pull-down menus
These are the standard pull-down menus through which you can access almost all commands.
*Main toolbar
This has most of the standard Windows icons, as well as the most common AutoCAD commands.
*Property toolbar
This toolbar gives a way to quickly modify an object's properties, such as layer and linetype.
* Floating toolbar
This is a toolbar that can be moved around the screen, or 'docked' as the main toolbar is.
*Drawing space
This is where you draw. You have an almost infinite area to draw and this is just a 'section' of the entire space.
*Scrollbars
These work like in other windows programs. You can also use the PAN command to move around your drawing.
*WCS Icon
This is here to show you which direction positive X and positive Y go. The W means you're in the World Co-ordinate System. (It can be changed to a User Co-ordinate System.)
*Status Bar Tray Icons
These icons give you updates on items like reference files program updates and print status.
*Command line
When you type a command, you will see it here. AutoCAD uses this space to 'prompt' you for information. It will give you a lot of information and tell you where you are in the command. Watch this line while learning.
* Status bar
This allows to see and change different modes of drawing such as Ortho, Osnaps, Grid, Otrack, etc.
*Tool Palette
Collection of tools in one area that can be organized into common catagories.


